Vinverth DVD player No Eject problem Repair and amplifier added
I got one Vinverth DVD Player Model VGDP 3218 with the complaint that it was not being used for a long time, and now the tray does not open.
As usual, I opened the set and did a general cleaning. (The picture you see below is the work completed unit, as I forgot to take a snap before that)

I unscrewed the tray unit, disconnected the connectors of eye unit, sliding motor unit and loading motor unit from the main board. Gave a 5V DC to the loading motor from my power supply and noticed the tray was not coming out, though the motor was running, indicating that the belt was loose. So, turned the gear wheel manually and ejected the tray out fully. Gently pushed the locking pins and removed the tray out. Located the loading motor and the belt and replaced it. (Since I forgot to take snaps of it, I am providing the inside of a similar tray that I had with me, for a general guidance of how it looks like. )
 Pushed the tray back in its slot, connected the three connectors back in place. (For detailed working/service of DVD players, please read Humphrey Kimathi’s book on DVD player repair), switched on and found the tray was going in and out. Gently cleaned the eye with a cotton. Played a CD and it worked well. Now comes the additional job on this DVD player.
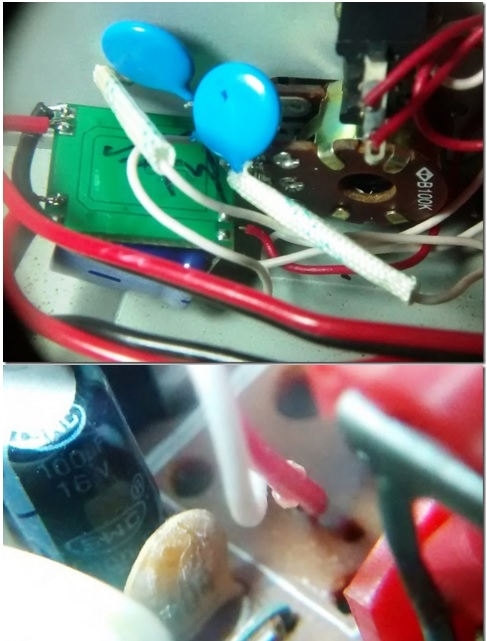
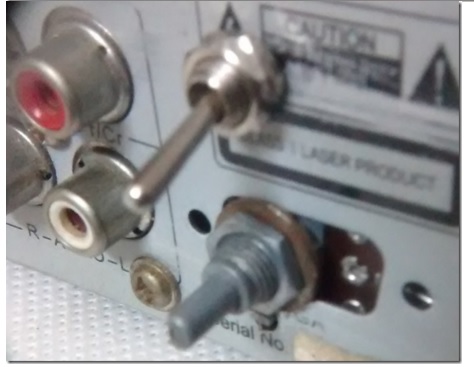
The customer had one Pioneer DVD player, in which I had fit PM8403 amp PCB with Philips type speaker connectors. Since that had become defective due to failure of the eye, he wanted me to remove it and connect it in this DVD player. So, drilled a hole for the 5V DC on/off switch at the rear of this DVD player, removed its optical input as well as VGA connector from behind. Fit the volume control on the VGA slot and the on/off switch next to it. Inserted the speaker wires through the hole that was of optical input, and soldered the four wires on the PCB. Soldered the Left and Right input wires of the amp board to the audio outputs (Red and White RC sockets) of the DVD player. Soldered the Red 5V DC wire to the 5V DC that was provided on the rear board for the optical sensor. Soldered the ground points.

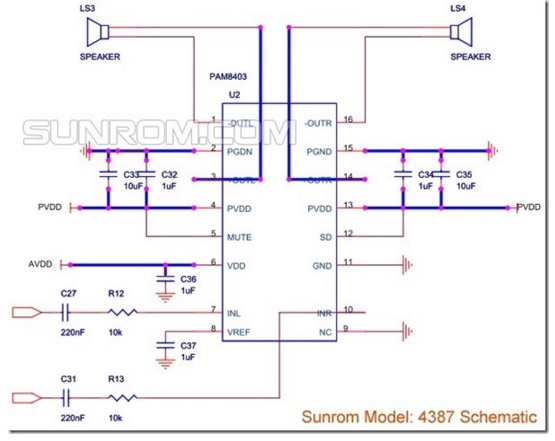
Now about this PAM8403 module. This is a 3W assembled small PCB available for purchase online. I had bought 10 pieces of this long back for fitting on DVD players as and when customers wanted. Here are the pictures, circuit diagram and other details of it:

One thing we have to be very careful is that the outputs are to be connected separately to the speakers, i.e., all four wires should be connected instead of the practice of connecting two outputs with a common ground. The outputs in this IC are isolated from ground and comes out as separate pins in the IC. The customer should be told not to switch on the amp unit without connecting the speakers. For more details on this IC and its use, please visit these links:
http://www.amazon.in/PAM8403-digital-power-amplifier-supply/dp/B00L9BJDM0/
https://www.openhacks.com/uploadsproductos/pam8403.pdf I bought these from: http://www.sunrom.com/p/stereo-audio-amplifier-pam8403 This comes with a diagram and instructions, portions of which are already presented here in the above pictures.
Connecting this to the DVD player is a simple work. Just add the positive and ground wires, and connect these to 5V DC (generally a high amp Diode on the secondary) supply coming out from the power supply, through an on/off switch for the positive wire. Since the current drawn by PAM8403 is very negligible, it won’t load the power supply. Next mount the PCB directly on the Stereo Volume Control Pins, by soldering the ground points, so that it will serve as a PCB Holder.
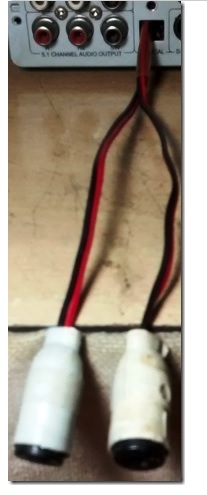
Connect two .1Mfd/100V Caps at the inputs (This is to isolate the input from other inputs that could be connected at the rear of the DVD player) and connect the other two wires to the audio output points on the DVD. Provide independent wires for the speaker outputs, put a good sleeve (a two wheeler petrol tube is an ideal one), where it comes out from the DVD to avoid rubbing on the sharp metal and possible cuts and shorts. Provide Philips type of speaker connectors.
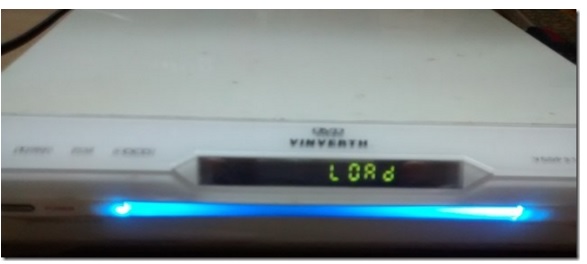
I use this so that the customers will not inter connect speakers wrongly and cause a short. You can ask the customer, which are the rear inputs they use, and remove those which are not used, obtaining their consent. Else, drill holes for fitting these at the empty spots inside the cover. That is all. It is a simple job and with experience, we can finish all these in about half an hour. Since the cost of this PCB is around Rs.90 (around 1.5 US$) each when bought in 10s, the volume control, on/off switch, two caps, and wires all put together would come to approximately Rs.200 (US$ 3.5US$). There are customers who want the player to work independently, without a need for connecting it to an amplifier or TV. So that is it. Here is a picture of the DVD working:
So, another job of repair and modifications completed satisfactorily.
As usual, I opened the set and did a general cleaning. (The picture you see below is the work completed unit, as I forgot to take a snap before that)

I unscrewed the tray unit, disconnected the connectors of eye unit, sliding motor unit and loading motor unit from the main board. Gave a 5V DC to the loading motor from my power supply and noticed the tray was not coming out, though the motor was running, indicating that the belt was loose. So, turned the gear wheel manually and ejected the tray out fully. Gently pushed the locking pins and removed the tray out. Located the loading motor and the belt and replaced it. (Since I forgot to take snaps of it, I am providing the inside of a similar tray that I had with me, for a general guidance of how it looks like. )
The customer had one Pioneer DVD player, in which I had fit PM8403 amp PCB with Philips type speaker connectors. Since that had become defective due to failure of the eye, he wanted me to remove it and connect it in this DVD player. So, drilled a hole for the 5V DC on/off switch at the rear of this DVD player, removed its optical input as well as VGA connector from behind. Fit the volume control on the VGA slot and the on/off switch next to it. Inserted the speaker wires through the hole that was of optical input, and soldered the four wires on the PCB. Soldered the Left and Right input wires of the amp board to the audio outputs (Red and White RC sockets) of the DVD player. Soldered the Red 5V DC wire to the 5V DC that was provided on the rear board for the optical sensor. Soldered the ground points.
Now about this PAM8403 module. This is a 3W assembled small PCB available for purchase online. I had bought 10 pieces of this long back for fitting on DVD players as and when customers wanted. Here are the pictures, circuit diagram and other details of it:
One thing we have to be very careful is that the outputs are to be connected separately to the speakers, i.e., all four wires should be connected instead of the practice of connecting two outputs with a common ground. The outputs in this IC are isolated from ground and comes out as separate pins in the IC. The customer should be told not to switch on the amp unit without connecting the speakers. For more details on this IC and its use, please visit these links:
http://www.amazon.in/PAM8403-digital-power-amplifier-supply/dp/B00L9BJDM0/
https://www.openhacks.com/uploadsproductos/pam8403.pdf I bought these from: http://www.sunrom.com/p/stereo-audio-amplifier-pam8403 This comes with a diagram and instructions, portions of which are already presented here in the above pictures.
Connecting this to the DVD player is a simple work. Just add the positive and ground wires, and connect these to 5V DC (generally a high amp Diode on the secondary) supply coming out from the power supply, through an on/off switch for the positive wire. Since the current drawn by PAM8403 is very negligible, it won’t load the power supply. Next mount the PCB directly on the Stereo Volume Control Pins, by soldering the ground points, so that it will serve as a PCB Holder.
Connect two .1Mfd/100V Caps at the inputs (This is to isolate the input from other inputs that could be connected at the rear of the DVD player) and connect the other two wires to the audio output points on the DVD. Provide independent wires for the speaker outputs, put a good sleeve (a two wheeler petrol tube is an ideal one), where it comes out from the DVD to avoid rubbing on the sharp metal and possible cuts and shorts. Provide Philips type of speaker connectors.
I use this so that the customers will not inter connect speakers wrongly and cause a short. You can ask the customer, which are the rear inputs they use, and remove those which are not used, obtaining their consent. Else, drill holes for fitting these at the empty spots inside the cover. That is all. It is a simple job and with experience, we can finish all these in about half an hour. Since the cost of this PCB is around Rs.90 (around 1.5 US$) each when bought in 10s, the volume control, on/off switch, two caps, and wires all put together would come to approximately Rs.200 (US$ 3.5US$). There are customers who want the player to work independently, without a need for connecting it to an amplifier or TV. So that is it. Here is a picture of the DVD working:
So, another job of repair and modifications completed satisfactorily.


I never thought that I would be doing this work without dependency, after reading your blog. I’m going to try it at home.
BalasHapus